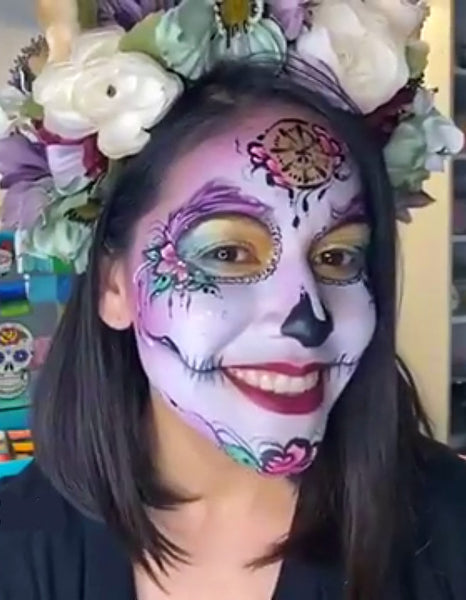
In this webinar, learn how to do a Dreamcatcher Sugar Skull with Vanessa Mendoza!

I usually start off with the base which is gonna be the Kryolan White and load my kabuki brush with it.
I'm gonna go in and just start building some color onto my face. Bring it up to the forehead, the jaw bone and your cheekbone. This is fun because instead of having that normal white stark face that you're used to, you're just adding some of that color to it and bringing out the features.
For sugar skulls, I tend to switch it over to makeup palettes so eyeshadows, powders. It's just a little bit easier to work with. I'll use my face paint for my line work and things like that.
I'm gonna go in with another brush and I'm gonna do the highlighting part with a shimmery white. We're gonna go on the bridge of the nose, the chin, the top of the forehead.
Now we're gonna go with a color on the eyes. For the eyes I do like using smoothie blenders. I'm gonna go in with green and gold. I'll start off with the lighter color on the inside of the eye and then use the darker color on the outside. I'm just swiveling back and forth and it already gives me that shape that I'm looking for. I'm gonna go all the way up to just underneath that top of my eyebrow. I don't wanna go past that.
I prefer not to make the eyes too big because then I think it just overpowers the design and the look and you can easily go too big with the eyes when you start putting paint past the eyebrow.
There is a trick to think about when you're actually gonna start doing the line work. You don't wanna do line work cutting through the eyebrow or even in the eyebrow 'cause it's just gonna be a mess. So the thing that I do is I'm going to put as much eyeshadow on my eyebrow and then from there, I will be outlining that. The outline will be just above the eyebrow.
Because it's gonna be a dreamcatcher theme, my focal point is going to be right in the middle of the forehead. I'm gonna go in with the same color as that gold on the eyes and I'm going to just use the same smoothie blender and give myself a circle on the forehead. You have a certain amount of space on your face so you don't have to be literal with it so it doesn't have to be a traditional dreamcatcher that you're gonna see with feathers hanging down. I'm actually gonna do kinda the webbing of a dreamcatcher and the feathers coming up from the eyes.
So we're gonna go in with a split cake and this is gonna be for the feathers. I'm using the 1/2" Romantic Rose Brush. I'm gonna be going in with the darker shade on the outside of my brush. I'm gonna bring 2 feathers coming up around the eyes.
I'm gonna be layering so there's gonna be a feather in front and a feather in the back. I want to start with the feather in the back.
Let's go in with another color and do some flowers. I'm gonna add some flowers to the top of that circle that I did which is gonna be part of that dreamcatcher. Don't be afraid to not be symmetrical.
You always wanna tie in something at the bottom of the chin. That's something that I like to do. It's just to kinda balance it out. It doesn't have to be exactly the same at the top but just these little things that kind of tie everything together.
I'll add some green just because why not? Put those leaves in there. I am using the 1/4" Dagger from Marcela's Blazin Brush. I'm kind of flicking down to add some little flicks of greenery.
We're gonna go in with the black now. I like to go with my #3 round brush for my line work. I'm gonna go around the eyes first. I can even drag a little bit while it's still wet so it's not so harsh so I'm just dragging and blending as I go.
We're gonna start outlining and giving a little bit more definition to the feathers. We'll start off with the one on top. I'm just flicking. I feel like you can get away with not having to outline your flowers. This is just kinda giving it that organic feel and I like the thin to thick techniques on my designs just because I feel like you can get away with a lot more, you can add depth and texture and things like that.
This is where I'm gonna kinda bring in that dreamcatcher aspect to the eyes in addition to the feathers. We're gonna add some dots around the eye and then we're gonna lace it. Add some detail around the flowers that are going to be somewhat similar to some of the stuff that I've seen on different dreamcatchers which is the draping and the lines that come down. They usually have feathers attached and things like that.
So we're gonna do some webbing but I don't wanna draw it out on myself. I'm just gonna go in with some teardrops. Instead of drawing a line, I'm just going to make things easier for me and use dots. Visually, you're showing that there's a line but it's not really like a perfect circle line that you have to draw out.
We are going to just start adding some swirls coming down from the dreamcatcher. Then I'm gonna do the bottom piece of the face.
Now we're gonna go and fill in the nose, bringing in that same flow, those same lines that you've been doing.
Then we're gonna do some shading and I am just using a makeup brush and black eyeshadow. Add shadowing on all the places would kinda make an impact. You're just bringing those teeth out, add some shadowing into the flowers and leaves. Just adding a little bit more depth.
Let's add some white highlights and I'm going in with my #3 brush. Then we'll go in with that lip color. I'm gonna use a magenta.
Let's add some glitter and then I think we'll be done. I'd still do the eyeliner, add some eyelashes, gems, but that'll take forever so let's just add some glitter. So I'm gonna go in VIVID Glitter Purity and I'm gonna add it to highlight my cheekbone and spots that are not gonna really cover the design.
Then I'm gonna go in with some gold glitter and add it to the gold part of the eyes. And then we're gonna go in with a green glitter on the green part. Alright! I mean, you can go on and on and on and on so I'll stop there!
Products Mentioned in the Webinar:
Kryolan Aquacolor - White
Mehron Kabuki Brush
Colourpop Midnight Masquerade Shadow Palette
Kryolan Ultra Setting Spray
Elisa Griffith Color Me Pro Palette
Silly Farm Paint Pal Romantic Rose 1/2" Brush
Blazin Brush 1/4" Dagger Brush
Silly Farm Arty Brush Cake - Peaches N Cream
VIVID Glitter Chunky Glitter Gel - Purity
VIVID Gleams
If you missed the live webinar, you can watch it now in the video above or later on our YouTube channel. Thank you, Vanessa, for sharing your talents with us! Thank you to everyone who tuned in to the webinar. Click here to know our upcoming webinars.
 FREE SHIPPING FOR USA ORDERS OVER $100


Leave a comment (all fields required)