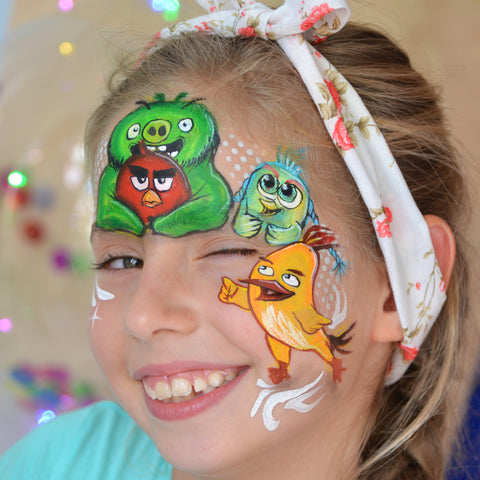
With the recent release of the second Angry Birds movie, kids will be lining up to get their faces painted like their favorite character! Follow along with this angry birds face paint design to create your own look!
In the second part there were several new characters, including the girl bird Silver, which I wanted to add to the main characters.
Most often you see drawings of birds in the form of masks, in step-by-step lessons, but today we will try to paint a more complex and unique design on the face.

Step 1
The first step is to use yellow color of Split Cakes - Snake and a Loew Cornell Round No.1 Brush to paint. The lines may be thinner because it is a sketch. King of pigs Leonard and Red - the main characters of the film, so place them in the middle of the forehead, Red will be in the arms of a pig. On the side of the face, on the temple draw approximate figures of birds silver and her brother Chuck. At this stage, you can try to portray facial features, so in the second stage, we will sketch the background, leaving only the area of the eyes, nose or beak clean.

Step 2
With the Cameleon #2 Angle Brush and Split Cakes - Snake draw the outlines of the king of pigs, leaving the eyes nose and mouth empty, then it was easier to draw facial features. The head of Red we paint with Cakes - 4 Color Dragon.

Step 3
Bird silver we will draw with Cake - Jelly Bean, a darker shade of paint unfold outward, this creates the effect of three-dimensional drawing. For quick Chuck, we use the light half of Cakes Dragon - yellow and orange.

Step 4
It's time for the stencil - Gradient - 1206! It is he who will combine all the elements into a single mask and complete the image. I use a special applicator for stencil - Lollipop Swabs, it is small and very convenient, if not, you can use a regular sponge. Next, using a round brush Loew Cornell No.1 gently draw the subtle elements, the faces of our heroes and stroke. Don't forget to draw white highlights in your eyes.

Step 5
We trace a thin brush and draw beaks and eyes for the remaining birds , proceed very carefully so that the hand does not waver. In order for our birds to get even more realistic look-draw a shadow under each figure, for this take a slightly damp brush and a little Diamond FX Black, blend the area under the bottom of the birds.

Step 6
The last step is to decorate our design with White Face Paint teardrop lines, direct them to the center of the face, towards the nose and chin, so we make our drawing more complete and harmonious.

I hope you enjoyed this look! I will be glad to see your designs!

Materials Used:
White Face Paint
Diamond FX Black
TAG 1 Stroke Cakes - 4 Color Dragon
Cameleon Single Stroke Colorblock Cake - Jelly Bean
TAG 1 Stroke Split Cakes - Snake
Cameleon #2 Angle Brush (3/4")
TAG One Stroke #12 Flat Brush (3/4")
Loew Cornell Round No.4 Brush
Loew Cornell Round No.1 Brush
Qosmedix Lollipop Swabs
BAM Mini Stencils Gradient - 1206
My name is Natalia, I live and work in Russia, the city of Yaroslavl. I do face painting for 7 years. One of my favorite destinations - belly painting, (so great to see how kids who have recently been in the tummy are already beginning to walk, talk and learn to draw) in my collection of 40 drawings for pregnant women. I've won a lot of face painting contests and now I want to teach you how to create beautiful drawings on faces. The most beautiful thing when you show your child the finished picture to see his shining smile
My Instagram page, https://www.instagram.com/natali_faceart/. and facebook https://www.facebook.com/nata.vfr
youtube https://www.youtube.com/channel/UCTOTMJXXqomz4ypwGqzqY7Q?view_as=subscriber
where you can find all the work.
 FREE SHIPPING FOR USA ORDERS OVER $100


Leave a comment (all fields required)