Halloween is just right around the corner, and you'll need to learn how to paint a devil face! In these easy to follow tutorials, you'll learn how to paint a devil face for boys, girls, and adults! Whether you're looking for cute devil face paint, sexy devil face paint, or just a regular devil face, there's something for everyone!
#1. How to Paint a Devil Face: Lil' Devil Face Design
 A devil design is a quick and easy face paint that can work for girls and boys alike.
Step-by-Step Instructions:
Step 1: Dampen hydra sponge, load with red paint and apply entire face.
Step 2. Use medium flat brush to make the black outline of the horns, use the edge of the brush to curve the horns.
Step 3. Continue with the black paint and round brush to add eyebrows and line under eyes that continues just past the edge of the eye.
Step 4. Use the flat brush and yellow to fill in the horns.
Step 5. Add the white highlight line at the side of the horns with round brush.
Step 6. Paint black detail lines at the bottom of the horn with the round brush.
Step 7. Finally draw the mustache and soul patch with black paint and flat brush.
To give a little style to our devil we added a cool hat. Have fun painting!
Products Used:
For this design we used the Graftobian Pro Paint: Crimson Red, Buttercup Yellow, Swan White and Raven Black.
Hydra sponge
Medium round brush
Medium flat brush
#2. How to Paint a Girl Devil Face by Kristin Olsson
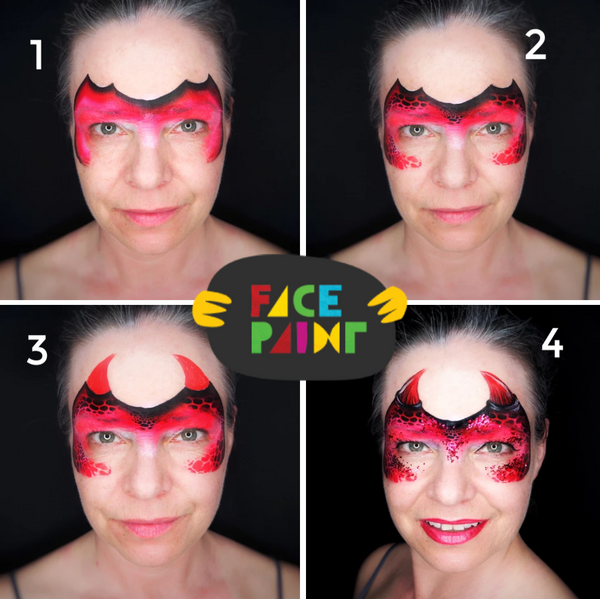
Bring out the mischievous side of you with this super fast, fun and sparkly She-Devil design!
Step-by-Step Instructions:
Step 1: First, I start by applying a light base with a sponge over the eyelids with white and pink. For this, I use glycerin based paints as they are much easier to blend.
Step 2: For this mask I don´t want to fill in the shape entirely with paint as I want it to have a lighter feel. Also, I will be adding glitter to this later so I want to leave some open space for that. I use a one stroke for the shape and I soften the edges with a sponge while the paint is still wet. This one stroke called Gypsy by Cameleon is one of my absolute favourites!
Step 3: For more interest and depth I then add some pattern with a stencil. I use a finger dauber for the stenciling, this gives me more control over where I want the pattern, especially under the eyes. I pick up color from the one stroke and use the dark part of the cake for the top area and the red/pink color under the eyes as I don´t want this area to look too heavy. The stencil I use here has a snakeskin pattern, but you can experiment with other textures as well.
Step 4: Using a round brush I pick up the red from the one stroke cake and paint the horns.
Step 5: As the one stroke cake here already has a black part, I only need to add some line work around the horns. To soften the black a bit I go over the horns with a soft blending brush.
Step 6: I go over the horns with a white paint to create some highlights - and then its time to glam the whole design up with some chunky glitter and some lip color! I only put glitter in a few selected areas so as not to cover up the background pattern.
Products Used:
Cameleon Colour Block Gypsy (sub Arty Brush Cake Cupcake)
DFX Black
FAB White
Chunky Glitter - Red
Small Sponge
Finger Daubers
BAM stencil - snakeskin
Loew Cornell angled brush
Cameleon Blending Brush
Round #3 Brush
#3. How to Face Paint a Devil Emoji by Kellie Burrus
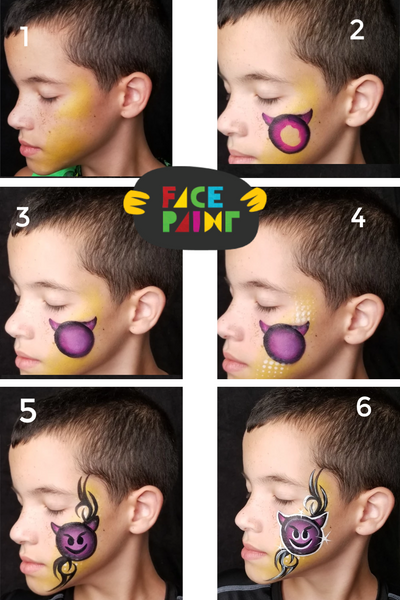
Step-by-Step Instructions:
Step 1: Use a pearl yellow/gold powder and softly blend over the area where the design will go.
Step 2: Use a small angled brush and a split cake that has black and purple and pink to create a circle with the black on the outside. Use the same brush and paint to create the horns.
Step 3: Use a sponge and white paint to fill in the center of the Devil. Stipples the sponge and pull the purple color in towards the middle to mix with the white.
Step 4: Take a sponge loaded with white and a stencil and add some texture from the top of the devil and bottom, following the yellow powder.
Step 5: Use a small round brush and strong black to outline the devil, add its features and create some tribal line work at the top and bottom of the devil.
Step 6: Use a small round brush loaded with a strong white to outline the devil. This will help to separate the devil from the tribal line work. Also use the white to highlight the devils features and line work and to add some star bursts. Now your Happy Devil Emoji design is complete!
Products Used:
Loew-Cornell Brushes - Round #1, Round #4
Always Wicked Round Sponge
Global Kapow Fun Stroke Cake from Hero Power Palette
Ben Nye Lumiere Powder Pallete
Lea Shelly Ultimate Graffiti Eyes Stencil
Global Strong Black
Diamond FX White
#4. How to Paint a Sexy Devil Face by Natalia Malley
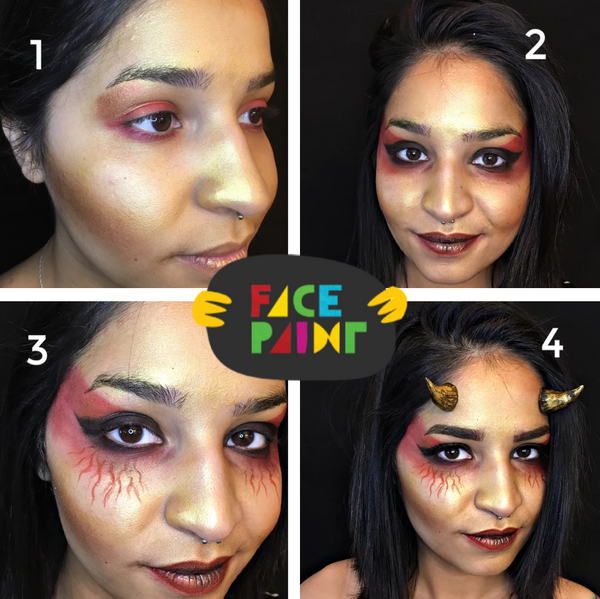
Step-by-Step Instructions:
Step 1: This step is optional, but adds a mystical effect to the overall look. Using a Kabuki brush and FAB Glitter Gold, apply a light coat of gold evenly all around the face.
Step 2: Using FAB Nut Butter Brown or FAB Bronze with a Kabuki brush, create some contouring below the cheekbones, at the jaw line, and in the center of the forehead to add dimension. Using Elisa Griffith's Color Me Pro Powders, I began by applying a bronze eyeshadow to the upper outer eyelid and began applying a dark red all around the eyes.
Step 3: I ended up using Elisa Griffith's black eye shadow to create a cat-like shape around the model's eyes. I created a sharp edge of the red eye shadow on the upper lid at a 45 degree angle, and then blended it on the bottom of the eyes into brown and then let it fade. I liked the contrast of the sharp edge on the upper eye to the soft gradual fade on the lower eye. Using FAB Red Rage as a base to the lips, let it dry completely, and then add bronze eye shadow as well as a little bit of black eye shadow to the lips to make the colors cohesive with the eye design.
Step 4: Using a very small round brush and FAB Red Rage, paint wavy vein-like lines coming from the bottom of the eyes. This will give your She-Devil look a creepy edge that's sure to evoke a reaction.
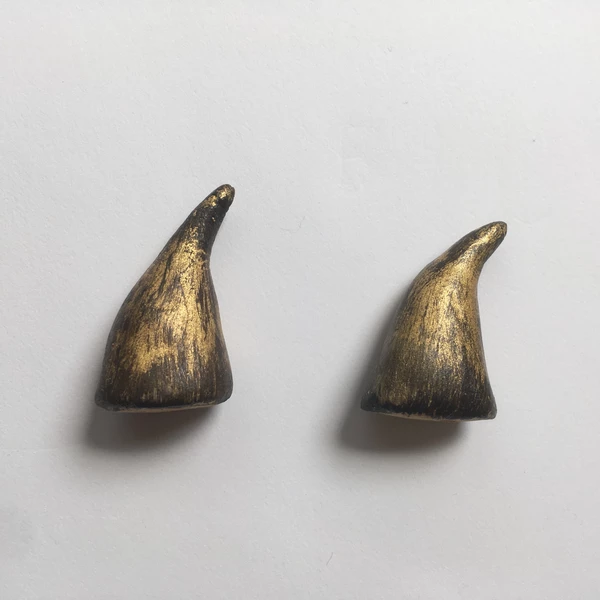
Step 5: I pre-made these horns in anticipation of creating this design. The whole process took only a few minutes, but needed a couple of days to dry. Using Model Magic sculpting clay, I formed the horns with my hands and let them dry overnight. The next day I painted them with gold acrylic craft paint, let dry and then rubbed with black acrylic craft paint to add a weathered look. I let them dry overnight again, and then they were ready to use. I adhered them using Pros-Aide glue by applying the glue to the flat bottom edges of the horns and then waiting a couple of minutes until the glue was clear and tacky before adhering them to her forehead.
Products Used:
FAB Glitter Gold
FAB Nut Brown Shimmer
Kabuki Brush
Elisa Griffith Color Me Pro Palette
Makeup Brushes
FAB Red Rage
Loew-Cornell Round #1 brush
Home-made Horns
Pros-aide Adhesive
#5. How to Paint a She Devil by Kellie Burrus
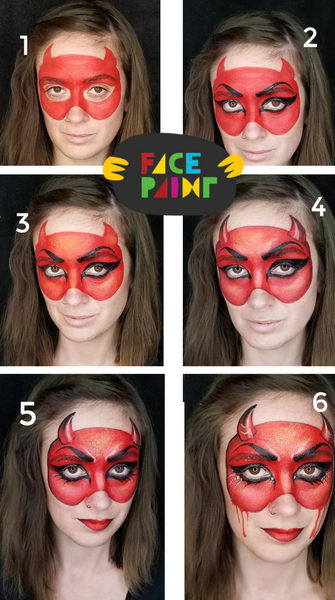
A She Devil is a great design for any time of year. Women and girls will love to feel feminine and scary with this design.
Step-by-Step Instructions:
Step 1: Use a large round brush and bright red face paint to sketch and lay out a she devil mask complete with horns.
Step 2: Use a medium round brush and black to add eye brows and eye liner over entire lid.
Step 3: Sponge on some orange in areas that need highlight; the forehead, on top of cheek bones and bridge of nose.
Step 4: Use a round brush and a soft black to outline and shade the mask and begin to define and shade the horns. Use white to enhance highlights down the length of the horns, right above the inner brows, bridge of nose and cheek bones.
Step 5: Use a small round brush to outline the design and horns with black and paint lower lashes. Add some glitter and lipstick.
Step 6: With a round brush, add some blood dripping from the sides. Use a round brush and silver metallic paint to add some dots along some of the lower lashes and inner corners of eyes- and you’re done!
Products Used:
Mehron Paradise Beach Berry
Graftobian Silver
Mehron Paradise Black
Mehron Paradise White
FAB Orange Tiger
Loew-Cornell Round #6
Loew-Cornell Round #8
Loew-Cornell Round #2
Paint Pal Pretty Petal 3/16" Brush (also available in Classic Brush Set)
Always Wicked Pink Sponge
Mama Clown Iridescent Glitter
Learn More
I hope you enjoy our videos! Please share it with your friends.
Check out our channel and subscribe! New tutorials and product reviews every week or so!
CHANNEL: https://www.youtube.com/user/facepaintify or see our Easy Designs Playlist
Like us on Facebook and let me know how we're doing!
FACEBOOK: https://www.facebook.com/FacePaintcom/
Thank you for watching! Subscribe for more video tutorials!


