
Simba has some big “Paws” to fill in the Lion King Movie. Elements that I chose to use for this design include "footsteps" that Simba has to follow to take what is his and also bright warm colors to simulate the African savanna where the film takes place.
Let's Paint!

Step One: stencil
I used the Quickez Center Point Stencil with Summer Sunrise Rainbow Cake to create a sunburst. It is off center toward the far side of the forehead as you will be painting Simba in the center.

Step Two: lion head
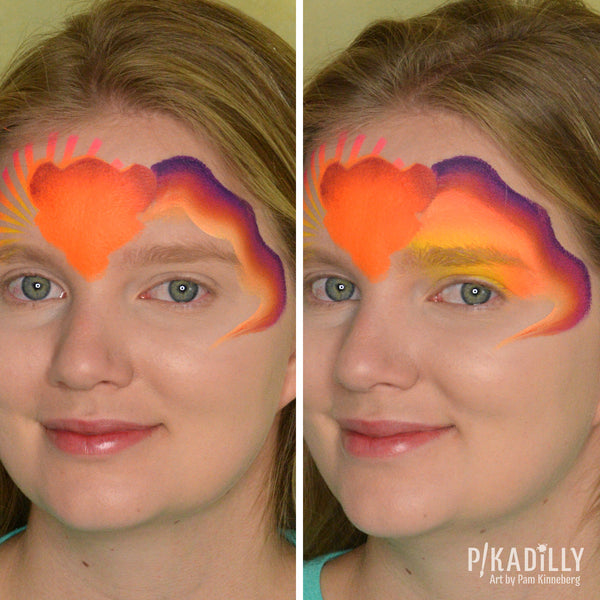
To speed up this design, I made a stencil of the shape of Simba’s head so I could quickly get the base on. I like to brighten up regular orange paint by mixing it with a neon orange. This gives it a brighter color. You can add dimension by blending in a darker orange at the top of the head.
Step Three: side detail
UsingGlobal Sydney one-stroke or a similar one-stroke with a 3/4” flat brush, paint a wavy strip from the head down around the eye, bringing it to a point (left). To fill in the empty area above the eye, use the sponge that you loaded with the Summer Sunrise cake to fill it in, blending it into the one stroke paint (right). You may just need to give the sponge a spritz of water to activate the paint that is already on the sponge. If there is not enough paint, just reload the sponge with the Summer Sunrise.

Step Four: outline
Outline Simba and fill in the facial details with Diamond FX Bordeaux Red and a small round brush. Once you do this a few times, it will be quick and easy. It just takes a little practice.

Step Five: paw prints
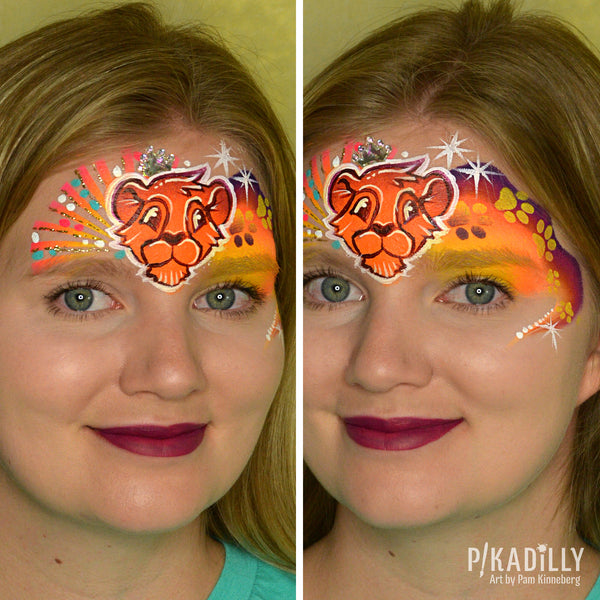
I used theGraffitiEyes Stencil Kit—PETS! for the paw prints. They are already lined up just like this on the stencil! A happy coincidence! Don’t you just love it when that happens! I used yellow for this so that they stood out on the dark burgundy background. Note: notice on the photo below, I added a little bordeaux red to the first paw print as it needed to have a little more contrast in order to stand out from the background.

Step Six: teal and white highlights
Add in a few teal dots to the rays for a contrasting color. Outline Simba’s head and add white highlights in his face so he pops and is a strong focal point. Finally, add some white dots and star bursts to the rest of the design for contrast and balance.
Step Seven: crown and lips
I had a cute little gem shaped like a crown that fit perfectly on Simba’s head. You could also paint a crown with gold paint. To give it a bit more sparkle, I lined the suns rays with brilliant gold Liquid Bling. This is always hard to photograph and looks so much better in real life. Finish the design off by painting the lips with the Superstar Berry Wine.

I encourage you to practice painting Simba’s head a few times to get familiar with it. The rest of the design is very simple. Have some fun painting this design on the little Lion King fans that will be sitting in your chair!
Supplies
FAB Tiger Mixed with Kryvaline Neon Orange
GraffitiEyes Stencil Kit - PETS!
Crown Gem
MiKim FX Round Sponge (cut in half)
Pam Kinneberg is the owner and artist for her business, PiKadilly Face Painting located near Fargo, North Dakota. She has won numerous contests and can be found in various magazines including SkinMarkz Magazine, The Colored Palette, QMagazine, Wet Paint Magazine and SillyFarm Newsletters.
Facebook: http://www.facebook.com/Pikadillyfacepainting
Instagram: @pikadillyfacepainting
Website: http://www.pikadillyfacepainting.com
 FREE SHIPPING FOR USA ORDERS OVER $100


Leave a comment (all fields required)